![[ Swingley Development ]](../images/title.png)
![[ Jump to Content ]](../images/blank_white.png)
Our House -- April 2001
The following pictures show some of the work we've been doing around our house this spring. All photos were taken in April 2001. If you'd like to see some more photos, this page has the most recent shots, this page has some photos from May 2000, this page has some photos from January 2000, this page has some photos from December 1999, and this page has some older shots from May 1999 before we moved in. Most photographs on this page are Copyright © 2001, Chris Swingley. All photos with me in them are Copyright © 2001, Andrea Swingley.
Each of the photographs are between 5 - 10 K, so the page will load slowly over a modem link.
Index of pages About Me:
Window Replacement
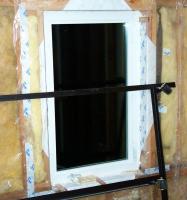 Well, here's how the whole process started -- replacing one of the
small, wooden windows in the guest bedroom with a larger, triple-pane
window. We figured that since we'd be putting siding on the house
this summer, we'd better replace the windows we wanted to replace
before the siding went up.
Well, here's how the whole process started -- replacing one of the
small, wooden windows in the guest bedroom with a larger, triple-pane
window. We figured that since we'd be putting siding on the house
this summer, we'd better replace the windows we wanted to replace
before the siding went up.
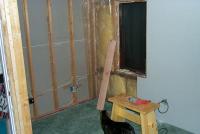
After clearing a space and installing the new window, we decided that rather than try to replicate the hideously ugly, gloss white, textured drywall surface around the new window, we'd replace all the drywall on the walls. Two days and two truck loads later, the walls are clear, and the new drywall is going up.
 Here's the second sheet of drywall I've ever hung. I missed the mark
by about 3/4 of an inch on the outlet and window, but it's already looking
better.
Here's the second sheet of drywall I've ever hung. I missed the mark
by about 3/4 of an inch on the outlet and window, but it's already looking
better.
That's Ivan at the bottom of the picture. He's in a bit of a crouch because of all the noise and excitement that has gone on up to this point.
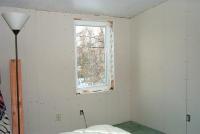 Another day of work hanging drywall, and the guest bedroom window
is installed and the drywall is covering the insulation. I still
need to tape and seal the sheets, prime the walls and paint, but the
room is livable again.
Another day of work hanging drywall, and the guest bedroom window
is installed and the drywall is covering the insulation. I still
need to tape and seal the sheets, prime the walls and paint, but the
room is livable again.
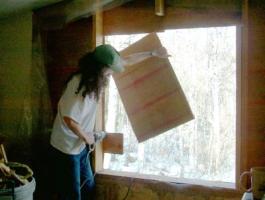 After my success in the guest bedroom, now comes the harder job --
putting a 60 x 48 inch window in the master bedroom to replace the
24 x 48 inch window that was here. First, I start ripping out the
drywall.
After my success in the guest bedroom, now comes the harder job --
putting a 60 x 48 inch window in the master bedroom to replace the
24 x 48 inch window that was here. First, I start ripping out the
drywall.
After pulling down the drywall and removing the insulation I cut off the studs where the new window header will go and remove the sheathing on the outside.
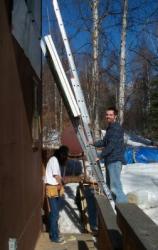 After spending one day getting the opening framed and square, Jamie
came over to help put the window in. In this photo you can see the
edge of the window resting on the lower half of the ladder. It's got
carpeting tied to it to protect it from the ladder, and we've got a
rope tied around it to help pull it up the ladder into position. I
pushed it from below, Andrea pulled on the rope, and Jamie was upstairs
in the opening fitting the window into place.
After spending one day getting the opening framed and square, Jamie
came over to help put the window in. In this photo you can see the
edge of the window resting on the lower half of the ladder. It's got
carpeting tied to it to protect it from the ladder, and we've got a
rope tied around it to help pull it up the ladder into position. I
pushed it from below, Andrea pulled on the rope, and Jamie was upstairs
in the opening fitting the window into place.
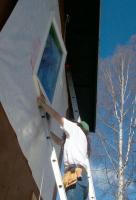 Here's me
pushing the window into the opening. The whole process was fairly
nerve-wracking, because of how heavy the window was, how close the
tolerances were (1/4 inch gap around the window), and how high up
the window really is. Not to mention how expensive a triple-pane
noble gas filled widow is!
Here's me
pushing the window into the opening. The whole process was fairly
nerve-wracking, because of how heavy the window was, how close the
tolerances were (1/4 inch gap around the window), and how high up
the window really is. Not to mention how expensive a triple-pane
noble gas filled widow is!
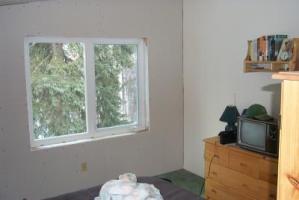 And here it is, all installed, with the drywall screwed in to protect
the insulation and vapor barrier from the cats. On to the drywall taping,
sanding and painting! My plan is to trim the windows using Alaskan birch
with a simple molding profile, maybe even just a chamfer on the corners.
And here it is, all installed, with the drywall screwed in to protect
the insulation and vapor barrier from the cats. On to the drywall taping,
sanding and painting! My plan is to trim the windows using Alaskan birch
with a simple molding profile, maybe even just a chamfer on the corners.