![[ Swingley Development ]](../images/title.png)
![[ Jump to Content ]](../images/blank_white.png)
Tools
This page is devoted to some of the tools I've made. Be sure to look at my projects page, as tools often appear there too.
A summary of all my project and plan pages appears at the bottom of this page.
Other Woodworking pages:
| Plans | Projects | OldTools Archive |
Spring Pole Lathe
 Several years ago I built a treadle lathe built from plans in Popular
Woodworking. The lathe was finicky, never seemed to run very smoothly, and
as a result, I never used it for much beyond turning pegs and other rough
turned cylinders. After watching a Welsh chairmaker on The Woodwright's
Shop quickly turning spindles on a very simple spring pole lathe, I decided
to convert my treadle lathe to a spring pole variety.
Several years ago I built a treadle lathe built from plans in Popular
Woodworking. The lathe was finicky, never seemed to run very smoothly, and
as a result, I never used it for much beyond turning pegs and other rough
turned cylinders. After watching a Welsh chairmaker on The Woodwright's
Shop quickly turning spindles on a very simple spring pole lathe, I decided
to convert my treadle lathe to a spring pole variety.
A spring pole lathe has a great advantage in it's simplicity, but it does require refining your turning techniques. A treadle lathe has the great advantage of turning the up and down motion of the pedal into continuous (assuming the rope doesn't slip. . .) rotatary motion. With a spring pole lathe, you can only turn on the down stroke, so you have to get used to pushing the tool into the work on the down stroke, and pulling it back every so slightly on the return stroke.
I don't have any plans for my lathe, but I do have a web page that has some design considerations, photographs and a few measurements. There are many alternative designs on the Internet, in Roy Underhill's books, and on his PBS television show The Woodwright's Shop.
Chamfer Plane
 Last spring
(2001) I replaced several windows in my house and wanted to
also add my own window trim. Rather than buy stock moldings I
decided to start simple and make my moldings using 4/4 stock with
a chamfer on the edges. This provided a perfect opportunity to
make another tool -- a chamfer plane!
Last spring
(2001) I replaced several windows in my house and wanted to
also add my own window trim. Rather than buy stock moldings I
decided to start simple and make my moldings using 4/4 stock with
a chamfer on the edges. This provided a perfect opportunity to
make another tool -- a chamfer plane!
Download Plans for this plane (65 Kb PDF file).
I also figured I'd try my hand at making the iron for the plane. Since chamfering isn't that demanding of an application (no knots, generally straight grain, a narrow cut) it seems like the perfect sort of plane to take a less than perfect home-made iron.
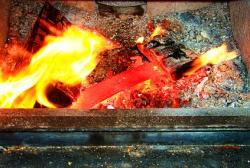 The first step in making the plane iron is to anneal the hardened
leaf spring in the wood stove. Once the wood stove had lots of good
hot coals at the bottom, place the leaf spring on the coals, set
a fresh piece of wood on top, and open up the air on the wood stove
all the way. After about 15 minutes, the iron is red hot and can be
placed in a bucket of ashes to cool. You can also let the metal cool
as the stove cools, but I was concerned about leaving it in the fire
too long as carbon will migrate out of the metal when it gets hot.
The photo on the left shows the red hot leaf spring right before
I put it into the ashes.
The first step in making the plane iron is to anneal the hardened
leaf spring in the wood stove. Once the wood stove had lots of good
hot coals at the bottom, place the leaf spring on the coals, set
a fresh piece of wood on top, and open up the air on the wood stove
all the way. After about 15 minutes, the iron is red hot and can be
placed in a bucket of ashes to cool. You can also let the metal cool
as the stove cools, but I was concerned about leaving it in the fire
too long as carbon will migrate out of the metal when it gets hot.
The photo on the left shows the red hot leaf spring right before
I put it into the ashes.
Once the spring has cooled completely, it can be cut with a hacksaw to the size needed, and hammered flat. I've also hammered them flat while they were still hot (which is probably less likely to crack them), but it shouldn't matter if the metal has been annealed properly.
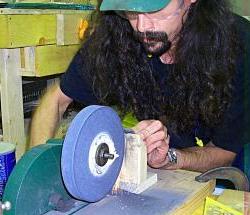 Next, cut, file or grind an initial bezel on the edge of the iron.
It doesn't have to be perfect, and you don't have to grind all the way
to the edge because you'll have to re-grind the bezel and flatten the
back after hardening and tempering. Hardening will weaken the outer
layer of metal, and you'll need to remove this metal.
Next, cut, file or grind an initial bezel on the edge of the iron.
It doesn't have to be perfect, and you don't have to grind all the way
to the edge because you'll have to re-grind the bezel and flatten the
back after hardening and tempering. Hardening will weaken the outer
layer of metal, and you'll need to remove this metal.
Once you've gotten the shape close to what you want, you're ready to re-heat the iron in the wood stove until it is cherry red. The object is to get the metal to the Curie point where a magnet no longer sticks to it, and then quench it in water, brine, or oil. By most accounts, oil is the safest medium for the quench because it is a slower process and is less likely to cause cracks or weakness in the metal. Oil is smelly and can catch on fire, however, so be ready. I've been using hot water and haven't had any problems, but you never know when you're using recycled metal.
 Now the iron has
been hardened, is very brittle, and will be hard to sharpen.
People talk about a file "skating" across the surface rather than
digging in. If you drop the iron or hammer it, it will break.
To make the metal more resiliant, it needs to be tempered. The
easiest way to do this is to set your oven to 375 - 450, and heat
the iron in the oven for an hour or so. Lower temperatures result
in an iron that stays sharper longer but is more brittle.
Now the iron has
been hardened, is very brittle, and will be hard to sharpen.
People talk about a file "skating" across the surface rather than
digging in. If you drop the iron or hammer it, it will break.
To make the metal more resiliant, it needs to be tempered. The
easiest way to do this is to set your oven to 375 - 450, and heat
the iron in the oven for an hour or so. Lower temperatures result
in an iron that stays sharper longer but is more brittle.
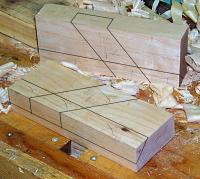
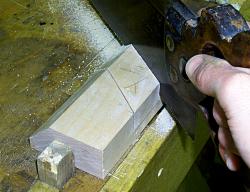
 Start on the body by
cutting, squaring and smoothing the two halves of the plane body.
I used hard maple for my plane. The two faces that will be glued
together need to be perfectly flat and square to the bottom edge.
Next, mark the diagonal lines on the interior surfaces for the
mortise. Mark the second side using the marks you made on the
first half so any subtle (but irrelevant) measurement errors are
reflected on both halves. Also mark the depth of the mortise
on the top, and mark the edges of the angled sole on the inside
and bottom of each half. Your blanks should look similar to the
blanks on the left (my lines are over-emphasized in the image).
Start on the body by
cutting, squaring and smoothing the two halves of the plane body.
I used hard maple for my plane. The two faces that will be glued
together need to be perfectly flat and square to the bottom edge.
Next, mark the diagonal lines on the interior surfaces for the
mortise. Mark the second side using the marks you made on the
first half so any subtle (but irrelevant) measurement errors are
reflected on both halves. Also mark the depth of the mortise
on the top, and mark the edges of the angled sole on the inside
and bottom of each half. Your blanks should look similar to the
blanks on the left (my lines are over-emphasized in the image).
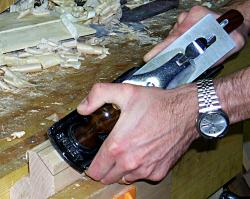
 It is easier to plane
the angled sole onto each piece before sawing and chopping the
mortises because the plane can ride on the sole all the way across
the piece. I'm using a Stanley jack plane (#5), planing right
to the lines.
It is easier to plane
the angled sole onto each piece before sawing and chopping the
mortises because the plane can ride on the sole all the way across
the piece. I'm using a Stanley jack plane (#5), planing right
to the lines.
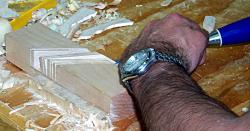 Saw along the edges of the mortise and
chop out the waste. This is much easier if you cut a series
of kerfs in the waste portion of the mortise. After roughly
chiseling out the waste, use a large chisel or a shoulder plane
to clean up the bottom of the mortise.
Saw along the edges of the mortise and
chop out the waste. This is much easier if you cut a series
of kerfs in the waste portion of the mortise. After roughly
chiseling out the waste, use a large chisel or a shoulder plane
to clean up the bottom of the mortise.
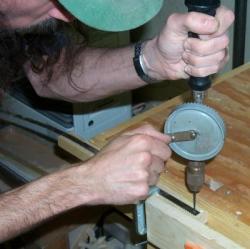
Once the mortise has been cleaned up, place the blank together in your vise, line up the sole and mortise perfectly, and bore a hole through both halves at the toe and heel. Use a spokeshave or whatever means you have to form pegs that fit into these holes. Finally, put some glue on the pegs and on the interior faces of the plane body, drive the pegs home and clamp the body together until the glue dries.
If the mortises don't line up perfectly, clean them up with a very sharp chisel, a plane maker's float, or a fine rasp.
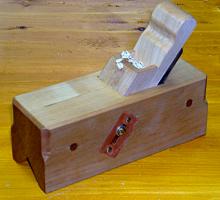
Bench Plane
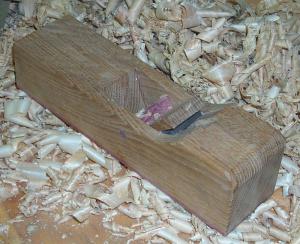 After using a few of
Steve Knight's
wooden planes I decided I should try to make my own. The plane
is made up of a large block of white oak that has been resawed
into a body and two cheeks, which after cutting the iron angle
and shaving relief cuts, are re-assembled with a cross-pin that
holds the iron and wedge in place. The sole and cross-pin
are made from purpleheart, and the plane is completed with a
Hock iron designed for
wooden planes.
After using a few of
Steve Knight's
wooden planes I decided I should try to make my own. The plane
is made up of a large block of white oak that has been resawed
into a body and two cheeks, which after cutting the iron angle
and shaving relief cuts, are re-assembled with a cross-pin that
holds the iron and wedge in place. The sole and cross-pin
are made from purpleheart, and the plane is completed with a
Hock iron designed for
wooden planes.
 From the pictures
you can see the purpleheart cross-pin and the purpleheart sole.
Although purpleheart is very hard, in retrospect I don't think
it makes a very good plane sole because it has a tendency to
chip at the mouth. Despite this, though, it works exceptionally
well. I set the mouth to be very tight and use the plane as a
medium-level finish plane in between a finely set #4 and the
Knight smoother.
From the pictures
you can see the purpleheart cross-pin and the purpleheart sole.
Although purpleheart is very hard, in retrospect I don't think
it makes a very good plane sole because it has a tendency to
chip at the mouth. Despite this, though, it works exceptionally
well. I set the mouth to be very tight and use the plane as a
medium-level finish plane in between a finely set #4 and the
Knight smoother.
Framesaw
This project came from several emails on the Old Tools list discussing how a traditional woodworker goes about resawing wide boards into thinner ones, or even into veneer. Most folks would use a bandsaw, but if you don't have one or you'd rather spare the electrons, here's how I built my framesaw. Many thanks to Tom Holloway on whose description in the OldTools archive this project is based.
 My version of the
frame saw uses 21 inch frame pieces to hold the blade, 26 1/8
inch stretchers with tenons that are 3/4 inches deep, 3/8 inches
wide and 1 1/4 inches long. They fit into mortises cut into
the frame pieces. I cut the blade 25 inches long, which fits
perfectly in the frame with the 3 3/4 inch bolts.
My version of the
frame saw uses 21 inch frame pieces to hold the blade, 26 1/8
inch stretchers with tenons that are 3/4 inches deep, 3/8 inches
wide and 1 1/4 inches long. They fit into mortises cut into
the frame pieces. I cut the blade 25 inches long, which fits
perfectly in the frame with the 3 3/4 inch bolts.
First I needed some thick support beams for the top and bottom braces of the framesaw. To provide the necessary support for the blade in tension between them, I laminated two pieces of 2" x 21" 4/4 birch together. (Now that I've finished the saw, I doubt if this was really necessary -- probably a single piece of 4/4 birch would have been sufficient for both the braces and stretchers.)
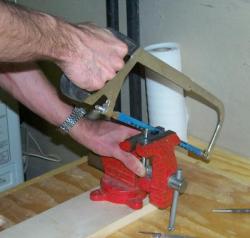
 I used a 1/2 inch wide,
6 tooth per inch bandsaw blade. To cut the blade to length (25
inches) I clamped it to a small block of wood and held the wood
against the bench while cutting it with a hacksaw.
I used a 1/2 inch wide,
6 tooth per inch bandsaw blade. To cut the blade to length (25
inches) I clamped it to a small block of wood and held the wood
against the bench while cutting it with a hacksaw.
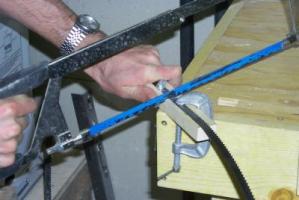
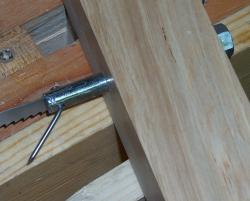
After cutting the blade to length, I drilled holes near the ends of the blade (above left.) The hardware that holds the blade in the frame is two 3/8 inch x 3 1/2 inch bolts, with the appropriate washer and nut. I used a hacksaw to cut off the head of the bolt, then hammered this end somewhat flat on an anvil, and cut a slot in the bolt.
 Finally, I drilled a
hole through the flat on the bolt. The blade slips into the slot
and a cotter pin or a bent nail goes through the hole in the bolt,
through the blade, and out the other side. The threaded end of
the bolt goes through 3/8 inch holes in the top and bottom frame,
and the blade is tensioned by tightening the nuts.
Finally, I drilled a
hole through the flat on the bolt. The blade slips into the slot
and a cotter pin or a bent nail goes through the hole in the bolt,
through the blade, and out the other side. The threaded end of
the bolt goes through 3/8 inch holes in the top and bottom frame,
and the blade is tensioned by tightening the nuts.
The mortises are 3/8 of an inch wide, 1 inch deep and 1 1/4 inches long and the tenons are cut to match.
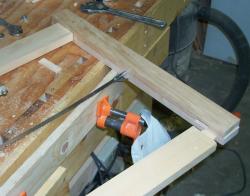 To cut the tenons
accurately with a hand saw I mark the cheeks of the tenon with a
marking gauge, and then cut each corner with a backsaw. Once the
corner cuts have been made, I cut down from the top with the
backsaw riding in the kerf I made with the diagonal cuts. This
insures that you meet the marked line in the front and back.
To cut the tenons
accurately with a hand saw I mark the cheeks of the tenon with a
marking gauge, and then cut each corner with a backsaw. Once the
corner cuts have been made, I cut down from the top with the
backsaw riding in the kerf I made with the diagonal cuts. This
insures that you meet the marked line in the front and back.
 You can see the
details of the frame and the way the blade is held in place.
The tenons in the stretchers fit into the mortises in the frame
(no glue is necessary because the tension on the saw blade will
force the tenons into the mortises up to their shoulders).
The image on the right shows the slot in the bolt that holds
the blade. Also notice the flat I pounded into the bolt before
cutting the slot. Not only does this make it easier to cut the
slot with a hacksaw, but it allows you to use a crescent wrench
on the flats while tensioning the blade so the blade remains
perpendicular to the plane of the frame.
You can see the
details of the frame and the way the blade is held in place.
The tenons in the stretchers fit into the mortises in the frame
(no glue is necessary because the tension on the saw blade will
force the tenons into the mortises up to their shoulders).
The image on the right shows the slot in the bolt that holds
the blade. Also notice the flat I pounded into the bolt before
cutting the slot. Not only does this make it easier to cut the
slot with a hacksaw, but it allows you to use a crescent wrench
on the flats while tensioning the blade so the blade remains
perpendicular to the plane of the frame.
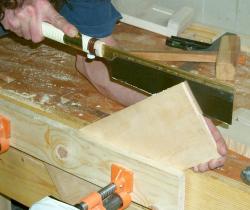 To use the framesaw,
first scribe a line all the way around your board, and then cut to
this line on the top two corners using a backsaw (here I'm using
a Japanese dozuki). When the kerf from the backsaw meets in the
middle, grab the framesaw and start cutting at 45 degrees in one
of the kerfs. Keep the blade on the waste side of the scribed
line in the front. The back side of the blade will be tracking
in the kerf you cut earlier.
To use the framesaw,
first scribe a line all the way around your board, and then cut to
this line on the top two corners using a backsaw (here I'm using
a Japanese dozuki). When the kerf from the backsaw meets in the
middle, grab the framesaw and start cutting at 45 degrees in one
of the kerfs. Keep the blade on the waste side of the scribed
line in the front. The back side of the blade will be tracking
in the kerf you cut earlier.
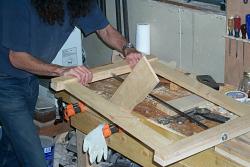 Once the blade has
reached the bottom of the kerf in the back, flip the board over
and place it in the vise at 45 degrees again. Resume cutting
to the line in the front until you reach the end of the kerf in
the back. This diagonal cutting and flipping continues down the
board until you have nothing left to clamp. At this point you
can finish the cut with your backsaw.
Once the blade has
reached the bottom of the kerf in the back, flip the board over
and place it in the vise at 45 degrees again. Resume cutting
to the line in the front until you reach the end of the kerf in
the back. This diagonal cutting and flipping continues down the
board until you have nothing left to clamp. At this point you
can finish the cut with your backsaw.
Router Plane
![[ router plane ]](images/jigs/router_plane.jpg) The photo
on the right shows my first sliding dovetail and the tools I
used to make it. The tool I built (as if you couldn't tell)
is the router plane in front of the dovetail slot.
The photo
on the right shows my first sliding dovetail and the tools I
used to make it. The tool I built (as if you couldn't tell)
is the router plane in front of the dovetail slot.
Here you can see how simple this tool is. The body is just two blocks of wood with a hole cut from top to bottom that holds the upright arm of the blade, and a hole cut from the front toward the back that holds a small eye bolt. The area where the two holes meet is chiseled out slightly so that the head of the eye bolt will fit between the boards.
![[ disassembled router ]](images/jigs/disassembled_router.jpg) These
images show the blade itself. It was made by grinding a standard 8
mm allen key (hex wrench) in the shape of a chisel blade. Be sure
to grind an angle into the bottom so the back of the blade will
be slightly higher than the cutting end. I used a belt sander
with 80 grit paper to do the grinding, but a bench top grinder
would work also. Be careful not to let the tip get too hot once
the blade edge starts to get thin. Once I got close to a blade
edge, I switched to my Japanese water stones so I wouldn't ruin
the temper on the steel.
These
images show the blade itself. It was made by grinding a standard 8
mm allen key (hex wrench) in the shape of a chisel blade. Be sure
to grind an angle into the bottom so the back of the blade will
be slightly higher than the cutting end. I used a belt sander
with 80 grit paper to do the grinding, but a bench top grinder
would work also. Be careful not to let the tip get too hot once
the blade edge starts to get thin. Once I got close to a blade
edge, I switched to my Japanese water stones so I wouldn't ruin
the temper on the steel.
You also need to scratch up the upper arm of the blade so the eye bolt has a rough surface to grab onto. I used a file to roughen the bit.
![[ router blade top ]](images/jigs/router_blade_top.jpg) Once you've got the blade ground out of a hex key
and it's sharp, simply slide the blade into the hole, tighten the
wing nut on the front of the plane, and you're ready to go. Although
it hasn't been a problem for me yet, if the blade starts to turn as
you are planing, you can fix the orientation of the blade using a
8 mm (or 5/16") hex wrench on the top of the plane body. Just slip
the head of the wrench over the allen key, and either hold the wrench
as you plane, or tack it in position with a nail or screw.
Once you've got the blade ground out of a hex key
and it's sharp, simply slide the blade into the hole, tighten the
wing nut on the front of the plane, and you're ready to go. Although
it hasn't been a problem for me yet, if the blade starts to turn as
you are planing, you can fix the orientation of the blade using a
8 mm (or 5/16") hex wrench on the top of the plane body. Just slip
the head of the wrench over the allen key, and either hold the wrench
as you plane, or tack it in position with a nail or screw.
| Display Cabinet | DVD Cabinet | Spring Pole Lathe | Benchtop Spill Plane |
| ABO Shelves | Shaker Sewing Steps | Magazine Cabinet | Krenov-Style Wall Hung Shelves |